Monday, November 26, 2012

My 2012 on Two Wheels

We're well into November now, and it's definitely too cold to ride my bike, so this seems the appropriate time to sum up my season of biking, now that my bike is hoisted up in the garage for the winter.

This past spring I was inspired by a coworker to try commuting on my bike. I had always loved biking back in college, as I lived a fair distance from most of the campus. Best of all is that this was a form of exercise I truly enjoyed. Since graduating though I slowly stopped riding and my bike remained in storage. I was already taking the bus to and from work, so I could use the bike rack easily. I decided to take the bike into work on the bus in the mornings (to avoid working up a sweat before work), and then biking home once or twice a week as my schedule and the weather allowed. My coworker was able to provide his tips and advice which helped me get started. I was able to keep it up most weeks, although I cut back in mid-summer due to the high heat. Might have to try morning rides in the future.

I ride a Raleigh mountain bike; a tough (and heavy) piece of equipment that has served me well this year. Going into it I was a little unsure about taking a heavy-duty bike for long distance rides (as opposed to a faster, lighter road bike), but I figured if I could handle that it would only make me stronger, and it was the only bike I owned. I also saw the undertaking as a personal challenge, to see what this former heart patient was really capable of.

Tuning up the bike on my ghetto bike stand (ladder + 2 by 4 board)
One aspect of biking this year which I enjoyed more than I expected was GPS tracking. Using my employer-issued Blackberry, I set myself up with the Endomondo sports tracker app. Before every ride, I start recording on my phone, and when I'm done all my stats are uploaded to the website. From there I can see almost any aspect of my performance for the entire ride: speed, altitude, distance, etc... all laid out on a map. Over the course of the spring, summer, and fall I could see my average speed increasing. It became a fun, engaging competition with myself. Best of all I could see my total miles racking up. From April to October I pedaled 279 miles this year. By the end of the season I definitely noticed that hills had become easier and I had more endurance overall.

My miles per month for 2012
I explored a variety of trails between work and home, which was usually an 8-10 mile trip depending on the route. Thankfully Minneapolis has a great trail system, so only a small portion of my rides were on roads or sidewalks. On a few occasions I went out of my way for a 15+ mile trip to take my favorite trail, the Midtown Greenway, a scenic "bike freeway" of sorts through south Minneapolis. The highlight of the summer was participating in the Minneapolis Bike Tour, a 36 mile ride around the city. Several thousand riders turned out for the event and the weather was perfect. Streets were closed just for the event, and several fun pit stops were provided along the route, providing food and water. It was a blast being part of such a big event, and being free to ride at faster speeds on wide open streets. It was also a fun ego boost to be passing some road-bikers on my mountain bike. I will definitely be doing this again.

The 36-mile Minneapolis Bike Tour (shown in blue), as recorded by GPS/Endomondo
A self-shot of me at the finish line of the Minneapolis Bike Tour, Sept 16, 2012
Next season I plan on stepping up my game, riding more often and aiming for more miles, both overall and per ride. I may not be able to change the length of my commute, but I'd like to take some more long distance rides here and there, and see how far I can go to rack up some more personal victories in 2013.

Thursday, August 9, 2012

Checkerboard Chocolate Chip Cookies

So I was browsing the web the other day, learning about making checkerboard cakes, and in the process came across a video on how to make checkerboard cookies. The recipe was a pretty simple sugar/butter type cookie dough. While this recipe may have worked well for molding/building the checkerboard, it didn't seem particularly appealing. This got me thinking... how about chocolate chip cookies? More specifically, chocolate chip cookies and chocolate cookies with white chips. Two delicious recipes that would contrast well. The checkerboard procedure I saw made a cookie with a 4 by 3 grid, which I didn't care much for... I wanted something more symmetrical, so I decided to work out a way to get a 3 by 3 grid. Here's how it all worked out...

I started out by making a batch of Chocolate Chip Cookies, and a batch of Chocolate Cookies with White Chips. The dough was then placed between sheets of parchment paper on a cookie sheet and pressed into a 1/2" thick rectangular slab. They should be the same size or at least close to the same size. At this point the dough is too soft for holding its shape, so these slabs were refrigerated overnight. You could probably get by with an hour or two. The important thing is that the dough stiffens up so it can maintain its shape and thickness.

Once the dough has been chilled, slice the smallest rectangle into three strips of equal width. Then slice 3 strips from the other slab of the same width. Any extra dough can be set aside to make some non-checkerboard cookies.
Next, stack up the strips so you have one stack of light-dark-light, and another stack of dark-light-dark. Press them together so each layer sticks together. These will provide your alternating checkerboard pattern.
Now we start slicing off strips from the long edge of each "dough sandwich". Each strip should be as wide as the thickness of your original slabs. In my case this was about 1/2 inch. With all of the cold, hard chocolate chips in the dough, it was difficult to cut with a regular knife. I found that an electric knife worked well to cut through all the chips and give a consistent straight cut. For each "cookie log" you'll need a slice of one "sandwich" and two slices of the other.
Press your three strips together to form a checkerboard cookie "log". Note: your next "log" should be opposite of this one, so you don't use up one color pattern faster than the other. In the end I had one extra strip that ended up becoming "striped" cookies.
You can now start slicing off your checkerboard cookies from the cookie dough "log" at about 1/2 inch thickness. A regular knife seemed to work best at this stage. Whenever you're not slicing off cookies, place the checkerboard dough back in the refrigerator so it doesn't get too warm and soft.
Place on your ungreased cookie sheet, and bake at 350 degrees F for about 10 minutes, until the edges start to brown. Once removed from the oven, leave them on the cookie sheet for 10 minutes or so to finish baking while the next batch is in the oven.
Enjoy your cookies!

Thursday, July 26, 2012

The Color Jar - Microcontroller-driven fun for the kids

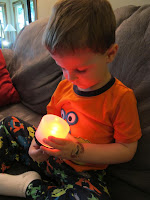
I finally managed to spend some time on a new electronics project at my workbench. Major credit for the idea goes to Paul, author of the Fangletronics blog. He is also a father and electronics tinkerer, so his blog certainly appealed to me. One post in particular (Pixie-Dust Bottles) stood out as a fun and relatively simple potential project, a good programming exercise, and something I thought my boys would enjoy. Shown at left is the final product, what I've been calling the Color Jar. It's a frosted plastic jar with a knob on top. As you turn the knob, the RGB LED light turns on inside the jar, and it smoothly cycles through all the colors of the rainbow, based on the position of the knob, essentially letting you "dial-in" a color.

The original design was built around an ATTiny13 microcontroller, but it ported over very easily to the ATTiny85 chip which I had on hand, as it has the same pinout but with more memory. I worked out the circuit on a breadboard, and then soldered it up on some proto board, and mounted it to the potentiometer to make it into a nice compact package. I made sure to use a chip socket for easy removal for reprogramming, which came in handy. The other major design change was the battery. Since my plastic jar allowed some more space in the lid, I decided to use a larger 3 volt CR2 "Photo" battery (not a small watch battery) that should last longer.


For the most part, I used the programming from the original pixie dust bottle project, but had to make a couple updates & fixes for my project.

First was a hardware issue. I bought my potentiometer (with switch) from Radioshack, which was convenient, but turns out it was not linear. That is, the voltage change was not directly proportional to the amount of rotation. In practice, this meant that for the first half of the knob's rotation there was almost no voltage change, so for most of the rotation the light would only show red. I took a series of voltage measurements at different degrees of rotation, and used Excel to graph out the signal curve. From there I was able to come up with a formula to take my input signal and adjust it to a more linear value. This allowed me to more evenly spread each color over the full rotation of the knob. The extra-low voltages at the bottom of the range also made it difficult to get consistent readings, which made my light flicker a little. I was able to smooth this out by taking 10 input readings per cycle with a 2 millisecond delay between each and averaging them to get my final input value.

The other issue was a programming bug in the code I was using. At a certain point between green and cyan, the LED would start flashing/flickering red. Looking at the code I had a hunch it was a math error in the way the RGB color was being calculated. To be sure, I did the math and found out it was calculating a Red value of -2, when normally this should be between 0 and 255. It might be fun to refactor the code and come up with my own algorithm for calculating the colors, but for now I just left the main logic in place, and then added a few lines to force any values below zero back to zero, and anything over 255 set back to 255, to keep everything in the appropriate range. This got rid of the flickering, and overall I'm happy with the performance of the Color Jar.

While Nathan may not appreciate the electronics and programming running inside it, he definitely enjoys the Color Jar, and that's the biggest payoff for me :-)

Monday, April 9, 2012

My biggest cake yet... Cruise Ship Cake

Last month, my sisters and I got to put together an over-the-top 60th birthday party for our parents. They love going on cruises, and unfortunately had to cancel their cruise reservation for this year (the first since Dad's original cancer diagnosis) because he was just diagnosed with the same cancer again. With a long road of of treatment ahead of them, we wanted to go all out and throw them a birthday party to remember. To make a long story short, the party was a huge success, and was full of the artistic touches that my family is known for. My main contribution was this nearly 3-foot long cruise ship cake:


The Plan:

I wanted to make a relatively long cake to best represent a typical cruise ship, and have multiple decks. I figured the simplest way to get this shape would be to make 3 9x13 cakes, and cut them down the middle, giving me several 4 1/2" wide cakes which I could cut and stack. I've only worked with fondant once before, and I wasn't that impressed with it, so I wanted to focus on a better tasting cake and use regular frosting instead. This would make it a bit more difficult to make the necessary details to make it look enough like a cruise ship. So I set out to make some good windows...

Windows:

I didn't want to pipe out frosting windows. The idea seemed too tedious and labor intensive, especially since I'd be building the cake the day of the party. I also didn't want a bunch of frosted windows because they would look inconsistent in size and shape. This led me to the idea of making square windows out of white chocolate, colored blue. I did some experimentation ahead of time to get it right, and they turned out great. I melted white chocolate slowly in a double boiler setup, and colored it blue with food coloring. Once it was colored well enough, I poured it out on some wax paper on a cookie sheet, and layered another piece of wax paper on top. At this point I spread out the melted chocolate to an even thickness and put it in the fridge to chill and harden.

Cutting proved to be tricky. You can't just cut all the way through with a knife, otherwise it cracks and breaks in unpredictable ways. What worked best was to score the surface of the chocolate sheet, and then break it along the score-line. This method let me easily break it down into even strips, and then squares. This of course produced a number of irregular pieces which made for some good snacking.

In the end I made a couple hundred little blue windows and kept them in the freezer to prevent any melting or sticking together.

Baking:

I took the cheap and easy route for the cake itself... boxed cake mix and jar frosting. Both of which came from Aldi at a great price and were much tastier than I had originally expected. I went off of Wilton's cake batter recommendations, which said a 9x13 wedding cake should be made with 7 cups of batter (about 1.5 boxes of mix for each). Each cake was baked at 350 F for 35-40 minutes. The biggest thing I learned was how to properly flour a pan. I came across a youtube instructional video that recommended putting a sheet of parchment paper (also greased & floured) in the bottom of the pan. This makes it MUCH easier to remove from the pan. I tried once without this parchment paper bottom layer, and ruined a cake trying to get it out of the pan.

Assembly:

I planned out the design and so I knew how long the cake would be, and cut a plywood board a little larger. This was then wrapped in blue paper from the craft store to serve as my cake board. The first layer was laid out with wax paper strips underneath the edges (to protect the cake board and keep it clean). Between each layer was a mixture of chocolate and white frosting. This was chosen so it would resemble the wood floors on each deck. Mixing chocolate and white frosting is also an easy way to get light brown.

Decorating:

When I started the assembly my cakes were nearly frozen, but eventually warmed up. This made frosting a bit difficult toward the end. I got most of the outside done with a frosting spreader, but had to finish up by piping it on, otherwise the blade would pull off bits of cake and it wouldn't stick.

Last but not least I stuck on the windows, which really made the cake look like a cruise ship, and added a fun chocolate touch to each piece. This was fun to build, and even better to eat.

Best of all, it tasted great, and looked good surrounded by more of our fancy buffet.


Happy Birthday Mom & Dad!

Sunday, January 8, 2012

The Many Reconstructive Surgeries of Bobbleheads


Over the last couple months, our 2-year-old son Nathan has found his favorite new toys (and latest obsession) in the unlikely location of our Twins memorabilia shelf. He took a liking to our MN Twins Bobbleheads, although most of them aren't playing for the Twins anymore. We have Delmon Young, Joe Mauer, Torii Hunter, Joe Nathan, Brad Radke, Justin Morneau, and a small Ron Gardenhire figure that walks when you wind him up. We started lifting up Nathan to the height of the shelf and teaching him the names of each one, which he quickly picked up and could recite them in full to anyone who asked. Eventually we let him get them down and play with them. We like our bobbleheads, but we're no so attached to them that would deny our son the fun of playing with them.

Watching him play with the bobbleheads has been a constant source of entertainment and smiles. He brings them everywhere in the house. He'll stand them in a line in the laundry room, the bathroom, living room, kitchen, dad's workbench, and anywhere else he happens to be. He examines them with his doctor kit. He knows which ones are smiling, and he knows what each one is holding/doing (without looking). He sets them up on the dining room table so they can watch him eat his meals, and he lays them down for naps before he goes down for his own. It's ridiculously cute. To top it off, they seem to act as his conscience, and remember the rules of the house when he cannot. Lately his favorite is Delmon Young. Nathan tells us things like "Delmon Young says not to throw my fork on the floor" and "Delmon Young says don't bother the baby." Of course, you listen to him Nathan.

Knowing our son, we knew he would be careful with them (and he is), but accidents were bound to happen eventually. Joe Nathan's and Brad Radke's heads have come loose, which were easily fixed by re-gluing the spring to the head/body with some good epoxy. That was easy.

Then Delmon Young hit the tile floor. Twice.

The first injury was a decapitation at the base of the neck. While some glue might have held it, it was a spot that would be put under stress regularly and could easily break again. More drastic measures were required. This called for some bobblehead spinal fusion surgery.

Luckily the plastic was hard but wasn't too difficult to drill. I drilled a hole down into the torso and used epoxy to set in the shaft of a screw to act as reinforcement. Then I drilled a larger hole in the neck to give me some room for proper alignment, and filled the cavity with epoxy. Overall I'd say it came together fairly well and should hold strong.


About this time I was feeling pretty proud of my skills as bobblehead repair man and Dad. Delmon's body would sit on the workbench for awhile to let the epoxy properly cure. During this time Nathan was very concerned about Delmon and sad that he was missing from the lineup. We had to go down and check up on him regularly. He felt much better when we let him take care of Delmon's head while the body was under repair. Here's Nathan enjoying a morning snack with Delmon's head:


Sadly, tragedy struck the bobble-Delmon again before he could be put back together completely. Delmon's head fell off a table in the basement, hit the tile floor, and broke open.


This was when I learned the head itself was hollow, and rather thin in some spots. Nathan was devastated, and looked to me with "Daddy fix it" coming out of his mouth as it had so many times before. Challenge accepted.

Knowing how thin the head was, I wasn't comfortable leaving it empty. I wanted to reinforce it so it would hold up better going forward. I proceeded to superglue the big piece back on, and placed it in a small vise to hold it together while I filled the cavity with spray foam. I left the small pieces out so the foam could expand until it dried. This is how Delmon looked for at least a day:


This photo was taken on my workbench the night I started the cranial reconstruction. The next day Nathan wanted to go check on Delmon as soon as we got him out of his crib. He spent the rest of the day up on the mantle in the living room so Nathan could keep an eye on him. All day he would point up to Delmon's foam-extruding head and say things like "I just want to give Delmon a hug" or "when Delmon be all fixed, then I can play with him." Sure thing kiddo, I'll do whatever I can for you (and Delmon).

Tonight I cut away the excess foam, and trimmed back some of the plastic to get everything to fit. The fit wasn't as perfect as when it originally broke. Adding foam, glue, and epoxy kind of messed up the fit, but I think I got everything to come together fairly well. After my work tonight, here's how he looks now, happily bobbling away with his newly reinforced neck and head, ready to play some baseball. I made sure to get photographic evidence of him fully assembled and unbroken, as it may not last forever.


Tomorrow morning Delmon will rejoin his teammates (currently lined up on the Piano in our living room) for more adventures with our son around the house. I like projects & handyman challenges, and I love to make my kids happy. Thanks Nathan. Take care of the guys, I'd hate to see you have to lose one if he got damaged beyond repair.