Thursday, July 17, 2014

Capturing log messages in the MSTest Unit Test Output with Common.Logging

Lately I've been enjoying the abstraction of a logging facade in my .NET apps, specifically the Common.Logging project. This provides me with a simple, standard interface for logging in my code which I can configure to output to a variety of destinations. Typically I send the logging output through NLog to a combination of outputs (file, email, event log, etc), but the beauty of using a logging facade is that you can change how the log messages are handled without changing your production code.

Today I though it would be nice to see what my code was logging during my unit tests, and I didn't want to dig through a log file to find the log from one specific test. Since the unit test runner is a different executing assembly than my web project, it can have it's own configuration for logging separate from the application. Knowing this, I should be able to set up this new logging behavior for my tests without changing anything in my main project's configuration.

So what makes it possible to log messages from Common.Logging to the standard unit test output?
  • Anything written to Console.Out during a unit test will get captured in the unit test Output.
  • Common.Logging ships with a built-in Console.Out logger adapter that we can use without requiring a larger logging framework.
Knowing these two facts, we can implement this easily in a Unit Test Project:
  1. The code being tested should be doing its logging through the Common.Logging log methods.
  2. Using NuGet, install the Common.Logging package into your unit test project
  3. In the unit test project's App.Config file, add the necessary XML to configure the console logger (See XML snippet below)
  4. Run your unit test(s)
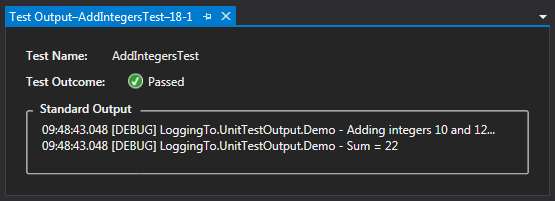
  5. See the log messages captured during each test in your test output:
And of course, let's not forget the code and configuration details:

Thursday, July 10, 2014

Running Visual Studio Tests from a Network Drive

This afternoon I ran into an odd issue with Visual Studio 2013 that ate up an unreasonable amount of my time. I recently set up a new project using the built-in Git source control tools. To keep my project safer I put the repository on my network drive, which gets backed-up regularly. In the future we may get a central server, but for now this is good enough. The code was building and running with no problem until I tried running a unit test. No matter what I did Visual Studio couldn't detect any of my tests. The Test output window said:

------ Discover test started ------
Could not load file or assembly 'file:///U:\Repos\Scheduler\Scheduler\Scheduler.Web.Tests\bin\Debug\Scheduler.Web.Tests.dll' or one of its dependencies. Operation is not supported. (Exception from HRESULT: 0x80131515)
========== Discover test finished: 0 found (0:00:00.5040504) ==========

It took some digging, and a few failed attempts at other suggested solutions, but I finally found the workaround:

  • Open a command prompt and type "setx COMPLUS_LoadFromRemoteSources 1"
  • or
  • Create an environment variable named COMPLUS_LoadFromRemoteSources
  • Set the value to 1
  • Restart Studio
Source: https://connect.microsoft.com/VisualStudio/feedback/details/502353/running-unit-tests-from-network-drive

Incidentally, I came across another suggested fix that involved changing a "LoadFromRemoteSources" value in the devenv.exe.config file, but this did not work for me. The Environment Variable did the trick.

Wednesday, July 2, 2014

From Steel Tubing to DIY Monitor Stand

About a month ago I started a new job, developing software for a manufacturing company that makes steel tubing of various shapes and sizes.

So what does a steel tubing manufacturer have an abundance of? Steel tubing. What do they do when they need new shelving, furniture, etc? Open the office supply catalog? Nope... They go to the maintenance department and make their own out of... you guessed it, steel tubing. This is not a knock on the company at all. As a big time DIY guy, I can appreciate this kind of self-sufficiency.

Case and point... this is the desk I inherited, made primarily out of 1" square tubing:


It's been several years since I've been able to work hands-on with metal (I miss the days of having full access to the machine shop at college). So I decided that I wanted to raise up my monitors, and do it myself with steel from the scrap bins. The room next door was being remodeled, and some extra monitor mounts were being taken down from the wall, which I could use in my new setup.

Over the course of a couple weeks, one of my coworkers introduced me to the guys in Maintenance and Quality while I collected, measured, and cut several pieces of sheet steel and square tubing. Our welder helped me weld together a few pieces, and I took care of drilling, cutting, and painting.

What I ended up with was a square tube support across the back, and two adjustable monitor mounts that hung from the bar. With a coat of black Rustoleum, I think it turned out quite nice.


One of my friends from my last job said that he couldn't wait to see all the stuff I would build in my house using steel tubing. While I don't foresee that happening in the near future (especially since I don't own a welder... yet), I have a feeling that this is how it starts. Today a monitor stand, tomorrow the world.

Tuesday, July 1, 2014

Getting Started with LESS CSS in your ASP.Net MVC project

Today one of my coworkers asked me for more information on a CSS preprocessor I had mentioned in one of our weekly meetings. I've been using LESS CSS lately for one of my projects and enjoying it. It simplifies the CSS I have to write, and the language is easy to follow as most of the syntax reads like standard CSS code.

Getting Started with LESS

Here’s the official LESS website that will walk you through how it works:
They have some good documentation and examples to get you started.

This was originally designed to “compile” the CSS in the user's web browser. I prefer to do this before it gets to the client. This offloads some of the work from the client browser, and ensures your CSS will always be generated the same way every time regardless of the client's browser capabilities. This also prevents the chance of making the page “blink” as it converts the LESS to CSS. This is especially applicable to me as my current web application project is running on a "thin client" machine which runs an older browser on a limited processor.

So how do we get from a LESS file to usable CSS? There are a couple ways to generate your CSS from LESS files…

Getting to CSS

The easiest way to get started would be to use the popular Visual Studio extension Web Essentials:
It provides great LESS support in Visual Studio (and lots of other handy features). Every time you save a LESS file, it automatically generates an accompanying CSS file in your project, which you can then reference in your page.

Too many files?

Personally I don’t like managing all the extra CSS files in my project. Part of me worries that my CSS won't always be "in sync" with my LESS file, either from some unseen bug or more likely a mistake I may make. I prefer to let the server automatically generate my CSS on the fly, and cache the generated result. This gets a bit more complex and requires some other packages, but I feel it's worth it.

First, I love the LESS preview function in Web Essentials, but as I mentioned I don't want the CSS files generated. This is easy to disable under Visual Studio's Tools > Options menu. Under Web Essentials > Less, disable "Compile files on save."

I use a NuGet package called dotLess (a .net based LESS compiler):
It handles all requests for .less files and returns the compiled CSS. This way I can put a reference on my page for a .LESS file and the server will return the compiled CSS automatically. The only drawback is that it isn't quite up to date with the LESS spec, so I've run into a few issues with some of the more complicated aspects of the LESS language. Thus far I've been able to work around them so I'm willing the accept the trade off for the convenience it provides.

Bundling & Minification

Generated CSS is great, but it's even better if we can bundle and minify everything to improve the page load time and the overall user experience.

For bundling & minification with dotLess, I use this package:
This gives me a “LessBundle” class that will let me bundle & minify multiple CSS & LESS files. For example, my BundleConfig.cs file in my MVC project has this entry in it:

bundles.Add(new LessBundle("~/Content/styles")
    .Include("~/Content/normalize.css")
    .Include("~/Content/less/Site.less")
);
Now, I can just include a reference to the bundle in my view:
@Styles.Render("~/Content/styles")
In debug mode I get a style tag for each file. The request for the less file will be handled by dotLess
<link href="/Content/normalize.css" rel="stylesheet"></link>
<link href="/Content/less/Site.less" rel="stylesheet"></link>
In Release mode, bundling and minification become enabled, and everything in the LESS Bundle is compiled with dotLess and minified into a single stylesheet link:
<link href="/Content/styles?v=OVSsAe9M_HQdBtQlL5-p9IRWblY32n6g5U4FaGEiUCE1" rel="stylesheet"></link>
More LESS Links: