Lately I've been building a web application against a database that I don't have full control over which is used by a variety of other internal applications. If something were to affect the performance of my app (such as a slow database query) I'd like to know before my users start to complain. To that end, I've built out some very basic always-on production monitoring/instrumentation. For example, I set up a Http Module to monitor response times on all Http requests, and log the ones that fall outside of a given threshold.
I've been using NLog, through the Common.Logging interface to handle this sort of thing. I have NLog configured to email me a log dump whenever an error or warning occurs. If I can just log a warning when a sql query takes too long, the rest of the process (logging, emailing, etc) is taken care of.
When I first started looking into it, I was looking at the new DbContext.Database.Log property in Entity Framework 6. I could set it to any action that takes a string, intercept the messages, and parse out the occasional log message that contained the query execution time. This was admittedly a bit messy, but it worked.
I did a little more research and discovered what I really needed... database interception. In particular, this article laid out a simple example of database interception code. However it didn't show any way to actually measure query execution time. I decided to figure out how the EF logger was doing it. After looking at some stack traces and poking around in JustDecompile, I found the System.Data.Entity.Infrastructure.Interception.DatabaseLogFormatter class. This is the class that actually generates the messages sent through the Database.Log action. It works as a database interceptor, and just implements a simple timer that starts and stops with each SQL command that passes through it. Armed with this information, I had enough to build up a proper sql monitoring class for EF6 that logs slow queries and also sql errors:
Wednesday, September 24, 2014

Thursday, July 17, 2014
Capturing log messages in the MSTest Unit Test Output with Common.Logging
Lately I've been enjoying the abstraction of a logging facade in my .NET apps, specifically the Common.Logging project. This provides me with a simple, standard interface for logging in my code which I can configure to output to a variety of destinations. Typically I send the logging output through NLog to a combination of outputs (file, email, event log, etc), but the beauty of using a logging facade is that you can change how the log messages are handled without changing your production code.
Today I though it would be nice to see what my code was logging during my unit tests, and I didn't want to dig through a log file to find the log from one specific test. Since the unit test runner is a different executing assembly than my web project, it can have it's own configuration for logging separate from the application. Knowing this, I should be able to set up this new logging behavior for my tests without changing anything in my main project's configuration.
So what makes it possible to log messages from Common.Logging to the standard unit test output?
Today I though it would be nice to see what my code was logging during my unit tests, and I didn't want to dig through a log file to find the log from one specific test. Since the unit test runner is a different executing assembly than my web project, it can have it's own configuration for logging separate from the application. Knowing this, I should be able to set up this new logging behavior for my tests without changing anything in my main project's configuration.
So what makes it possible to log messages from Common.Logging to the standard unit test output?
- Anything written to Console.Out during a unit test will get captured in the unit test Output.
- Common.Logging ships with a built-in Console.Out logger adapter that we can use without requiring a larger logging framework.
- The code being tested should be doing its logging through the Common.Logging log methods.
- Using NuGet, install the Common.Logging package into your unit test project
- In the unit test project's App.Config file, add the necessary XML to configure the console logger (See XML snippet below)
- Run your unit test(s)
- See the log messages captured during each test in your test output:
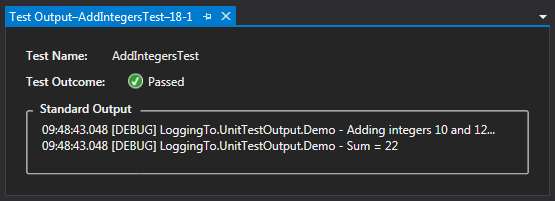
And of course, let's not forget the code and configuration details:
Thursday, July 10, 2014
Running Visual Studio Tests from a Network Drive
This afternoon I ran into an odd issue with Visual Studio 2013 that ate up an unreasonable amount of my time. I recently set up a new project using the built-in Git source control tools. To keep my project safer I put the repository on my network drive, which gets backed-up regularly. In the future we may get a central server, but for now this is good enough. The code was building and running with no problem until I tried running a unit test. No matter what I did Visual Studio couldn't detect any of my tests. The Test output window said:
It took some digging, and a few failed attempts at other suggested solutions, but I finally found the workaround:
------ Discover test started ------Could not load file or assembly 'file:///U:\Repos\Scheduler\Scheduler\Scheduler.Web.Tests\bin\Debug\Scheduler.Web.Tests.dll' or one of its dependencies. Operation is not supported. (Exception from HRESULT: 0x80131515)========== Discover test finished: 0 found (0:00:00.5040504) ==========
It took some digging, and a few failed attempts at other suggested solutions, but I finally found the workaround:
- Open a command prompt and type "setx COMPLUS_LoadFromRemoteSources 1"
- or
- Create an environment variable named COMPLUS_LoadFromRemoteSources
- Set the value to 1
- Restart Studio
Source: https://connect.microsoft.com/VisualStudio/feedback/details/502353/running-unit-tests-from-network-drive
Incidentally, I came across another suggested fix that involved changing a "LoadFromRemoteSources" value in the devenv.exe.config file, but this did not work for me. The Environment Variable did the trick.
Incidentally, I came across another suggested fix that involved changing a "LoadFromRemoteSources" value in the devenv.exe.config file, but this did not work for me. The Environment Variable did the trick.
Wednesday, July 2, 2014
From Steel Tubing to DIY Monitor Stand
About a month ago I started a new job, developing software for a manufacturing company that makes steel tubing of various shapes and sizes.
So what does a steel tubing manufacturer have an abundance of? Steel tubing. What do they do when they need new shelving, furniture, etc? Open the office supply catalog? Nope... They go to the maintenance department and make their own out of... you guessed it, steel tubing. This is not a knock on the company at all. As a big time DIY guy, I can appreciate this kind of self-sufficiency.
Case and point... this is the desk I inherited, made primarily out of 1" square tubing:

It's been several years since I've been able to work hands-on with metal (I miss the days of having full access to the machine shop at college). So I decided that I wanted to raise up my monitors, and do it myself with steel from the scrap bins. The room next door was being remodeled, and some extra monitor mounts were being taken down from the wall, which I could use in my new setup.
Over the course of a couple weeks, one of my coworkers introduced me to the guys in Maintenance and Quality while I collected, measured, and cut several pieces of sheet steel and square tubing. Our welder helped me weld together a few pieces, and I took care of drilling, cutting, and painting.
What I ended up with was a square tube support across the back, and two adjustable monitor mounts that hung from the bar. With a coat of black Rustoleum, I think it turned out quite nice.


One of my friends from my last job said that he couldn't wait to see all the stuff I would build in my house using steel tubing. While I don't foresee that happening in the near future (especially since I don't own a welder... yet), I have a feeling that this is how it starts. Today a monitor stand, tomorrow the world.
So what does a steel tubing manufacturer have an abundance of? Steel tubing. What do they do when they need new shelving, furniture, etc? Open the office supply catalog? Nope... They go to the maintenance department and make their own out of... you guessed it, steel tubing. This is not a knock on the company at all. As a big time DIY guy, I can appreciate this kind of self-sufficiency.
Case and point... this is the desk I inherited, made primarily out of 1" square tubing:
It's been several years since I've been able to work hands-on with metal (I miss the days of having full access to the machine shop at college). So I decided that I wanted to raise up my monitors, and do it myself with steel from the scrap bins. The room next door was being remodeled, and some extra monitor mounts were being taken down from the wall, which I could use in my new setup.
Over the course of a couple weeks, one of my coworkers introduced me to the guys in Maintenance and Quality while I collected, measured, and cut several pieces of sheet steel and square tubing. Our welder helped me weld together a few pieces, and I took care of drilling, cutting, and painting.
What I ended up with was a square tube support across the back, and two adjustable monitor mounts that hung from the bar. With a coat of black Rustoleum, I think it turned out quite nice.
One of my friends from my last job said that he couldn't wait to see all the stuff I would build in my house using steel tubing. While I don't foresee that happening in the near future (especially since I don't own a welder... yet), I have a feeling that this is how it starts. Today a monitor stand, tomorrow the world.
Tuesday, July 1, 2014
Getting Started with LESS CSS in your ASP.Net MVC project

Getting Started with LESS
Here’s the official LESS website that will walk you through how it works:
They have some good documentation and examples to get you started.
This was originally designed to “compile”
the CSS in the user's web browser. I prefer to do this before it gets to the client. This offloads some of the work from the client browser, and ensures your CSS will always be generated the same way every time regardless of the client's browser capabilities. This also prevents the chance of making the page “blink” as it converts the LESS to CSS. This is especially applicable to me as my current web application project is running on a "thin client" machine which runs an older browser on a limited processor.
So how do we get from a LESS file to usable CSS? There are a couple ways to generate your CSS from LESS
files…
Getting to CSS
The easiest way to get started would be to use the popular Visual
Studio extension Web Essentials:
It provides great LESS support in Visual Studio (and lots of
other handy features). Every time you save a LESS file, it automatically generates
an accompanying CSS file in your project, which you can then reference in your
page.
Too many files?
Personally I don’t like managing all the extra CSS files in
my project. Part of me worries that my CSS won't always be "in sync" with my LESS file, either from some unseen bug or more likely a mistake I may make. I prefer to let the server automatically generate my CSS on the fly, and cache the generated result. This gets a bit more complex and requires some other packages, but I feel it's worth it.
First, I love the LESS preview function in Web Essentials, but as I mentioned I don't want the CSS files generated. This is easy to disable under Visual Studio's Tools > Options menu. Under Web Essentials > Less, disable "Compile files on save."
I use a NuGet package called dotLess (a .net based LESS
compiler):
It handles all requests for .less files and returns the
compiled CSS. This way I can put a reference on my page for a .LESS file and
the server will return the compiled CSS automatically. The only drawback is
that it isn't quite up to date with the LESS spec, so I've run into a few issues with some of the
more complicated aspects of the LESS language. Thus far I've been able to work around them so I'm willing the accept the trade off for the convenience it provides.
Bundling & Minification
Generated CSS is great, but it's even better if we can bundle and minify everything to improve the page load time and the overall user experience.
For bundling & minification with dotLess, I use this
package:
This gives me a “LessBundle” class that will let me bundle &
minify multiple CSS & LESS files. For example, my BundleConfig.cs file in
my MVC project has this entry in it:
bundles.Add(new LessBundle("~/Content/styles")
    .Include("~/Content/normalize.css")
    .Include("~/Content/less/Site.less")
);
Now, I can just include a reference to the bundle in my view:
@Styles.Render("~/Content/styles")
In debug mode I get a style tag for each file. The request for the less file will be handled by dotLess
<link href="/Content/normalize.css" rel="stylesheet"></link>
<link href="/Content/less/Site.less" rel="stylesheet"></link>
<link href="/Content/styles?v=OVSsAe9M_HQdBtQlL5-p9IRWblY32n6g5U4FaGEiUCE1" rel="stylesheet"></link>
More LESS Links:
- This blog post covers much of the same information outlined here in greater detail: Yet Another "Add LESS to your ASP.NET MVC Project" Post
- Great LESS training course on PluralSight: A Better CSS: LESS and SASS
Monday, November 26, 2012
My 2012 on Two Wheels
We're well into November now, and it's definitely too cold to ride my bike, so this seems the appropriate time to sum up my season of biking, now that my bike is hoisted up in the garage for the winter.
This past spring I was inspired by a coworker to try commuting on my bike. I had always loved biking back in college, as I lived a fair distance from most of the campus. Best of all is that this was a form of exercise I truly enjoyed. Since graduating though I slowly stopped riding and my bike remained in storage. I was already taking the bus to and from work, so I could use the bike rack easily. I decided to take the bike into work on the bus in the mornings (to avoid working up a sweat before work), and then biking home once or twice a week as my schedule and the weather allowed. My coworker was able to provide his tips and advice which helped me get started. I was able to keep it up most weeks, although I cut back in mid-summer due to the high heat. Might have to try morning rides in the future.
I ride a Raleigh mountain bike; a tough (and heavy) piece of equipment that has served me well this year. Going into it I was a little unsure about taking a heavy-duty bike for long distance rides (as opposed to a faster, lighter road bike), but I figured if I could handle that it would only make me stronger, and it was the only bike I owned. I also saw the undertaking as a personal challenge, to see what this former heart patient was really capable of.
One aspect of biking this year which I enjoyed more than I expected was GPS tracking. Using my employer-issued Blackberry, I set myself up with the Endomondo sports tracker app. Before every ride, I start recording on my phone, and when I'm done all my stats are uploaded to the website. From there I can see almost any aspect of my performance for the entire ride: speed, altitude, distance, etc... all laid out on a map. Over the course of the spring, summer, and fall I could see my average speed increasing. It became a fun, engaging competition with myself. Best of all I could see my total miles racking up. From April to October I pedaled 279 miles this year. By the end of the season I definitely noticed that hills had become easier and I had more endurance overall.
I explored a variety of trails between work and home, which was usually an 8-10 mile trip depending on the route. Thankfully Minneapolis has a great trail system, so only a small portion of my rides were on roads or sidewalks. On a few occasions I went out of my way for a 15+ mile trip to take my favorite trail, the Midtown Greenway, a scenic "bike freeway" of sorts through south Minneapolis. The highlight of the summer was participating in the Minneapolis Bike Tour, a 36 mile ride around the city. Several thousand riders turned out for the event and the weather was perfect. Streets were closed just for the event, and several fun pit stops were provided along the route, providing food and water. It was a blast being part of such a big event, and being free to ride at faster speeds on wide open streets. It was also a fun ego boost to be passing some road-bikers on my mountain bike. I will definitely be doing this again.
Next season I plan on stepping up my game, riding more often and aiming for more miles, both overall and per ride. I may not be able to change the length of my commute, but I'd like to take some more long distance rides here and there, and see how far I can go to rack up some more personal victories in 2013.
This past spring I was inspired by a coworker to try commuting on my bike. I had always loved biking back in college, as I lived a fair distance from most of the campus. Best of all is that this was a form of exercise I truly enjoyed. Since graduating though I slowly stopped riding and my bike remained in storage. I was already taking the bus to and from work, so I could use the bike rack easily. I decided to take the bike into work on the bus in the mornings (to avoid working up a sweat before work), and then biking home once or twice a week as my schedule and the weather allowed. My coworker was able to provide his tips and advice which helped me get started. I was able to keep it up most weeks, although I cut back in mid-summer due to the high heat. Might have to try morning rides in the future.
I ride a Raleigh mountain bike; a tough (and heavy) piece of equipment that has served me well this year. Going into it I was a little unsure about taking a heavy-duty bike for long distance rides (as opposed to a faster, lighter road bike), but I figured if I could handle that it would only make me stronger, and it was the only bike I owned. I also saw the undertaking as a personal challenge, to see what this former heart patient was really capable of.
 |
| Tuning up the bike on my ghetto bike stand (ladder + 2 by 4 board) |
 |
| My miles per month for 2012 |
 |
| The 36-mile Minneapolis Bike Tour (shown in blue), as recorded by GPS/Endomondo |
 |
| A self-shot of me at the finish line of the Minneapolis Bike Tour, Sept 16, 2012 |
Thursday, August 9, 2012
Checkerboard Chocolate Chip Cookies
 So I was browsing the web the other day, learning about making checkerboard cakes, and in the process came across a video on how to make checkerboard cookies. The recipe was a pretty simple sugar/butter type cookie dough. While this recipe may have worked well for molding/building the checkerboard, it didn't seem particularly appealing. This got me thinking... how about chocolate chip cookies? More specifically, chocolate chip cookies and chocolate cookies with white chips. Two delicious recipes that would contrast well. The checkerboard procedure I saw made a cookie with a 4 by 3 grid, which I didn't care much for... I wanted something more symmetrical, so I decided to work out a way to get a 3 by 3 grid. Here's how it all worked out...
I started out by making a batch of Chocolate Chip Cookies, and a batch of Chocolate Cookies with White Chips. The dough was then placed between sheets of parchment paper on a cookie sheet and pressed into a 1/2" thick rectangular slab. They should be the same size or at least close to the same size. At this point the dough is too soft for holding its shape, so these slabs were refrigerated overnight. You could probably get by with an hour or two. The important thing is that the dough stiffens up so it can maintain its shape and thickness.


Once the dough has been chilled, slice the smallest rectangle into three strips of equal width. Then slice 3 strips from the other slab of the same width. Any extra dough can be set aside to make some non-checkerboard cookies.


Next, stack up the strips so you have one stack of light-dark-light, and another stack of dark-light-dark. Press them together so each layer sticks together. These will provide your alternating checkerboard pattern.

Now we start slicing off strips from the long edge of each "dough sandwich". Each strip should be as wide as the thickness of your original slabs. In my case this was about 1/2 inch. With all of the cold, hard chocolate chips in the dough, it was difficult to cut with a regular knife. I found that an electric knife worked well to cut through all the chips and give a consistent straight cut. For each "cookie log" you'll need a slice of one "sandwich" and two slices of the other.

Press your three strips together to form a checkerboard cookie "log". Note: your next "log" should be opposite of this one, so you don't use up one color pattern faster than the other. In the end I had one extra strip that ended up becoming "striped" cookies.

You can now start slicing off your checkerboard cookies from the cookie dough "log" at about 1/2 inch thickness. A regular knife seemed to work best at this stage. Whenever you're not slicing off cookies, place the checkerboard dough back in the refrigerator so it doesn't get too warm and soft.

Place on your ungreased cookie sheet, and bake at 350 degrees F for about 10 minutes, until the edges start to brown. Once removed from the oven, leave them on the cookie sheet for 10 minutes or so to finish baking while the next batch is in the oven.

Enjoy your cookies!

Subscribe to:
Posts (Atom)